
Download Voxelizer — Free 3D Slicer for PC
Voxel-based slicer and CAM software by ZMorph S.A. Prepare models for 3D printing, CNC milling, and laser cutting on Windows, macOS, and Linux.
What Is Voxelizer?
A voxel-based 3D printing slicer and CAM application built for multi-tool fabrication workflows.
Voxelizer is a free 3D printing slicer and CAM software built by ZMorph S.A., a hardware manufacturer based in Wroclaw, Poland. If you need to download Voxelizer for Windows, macOS, or Linux, this page covers everything from system specs to installation steps.
Most slicers work directly with triangle meshes. Voxelizer takes a different approach: it converts your 3D models into a grid of tiny cubes called voxels first, then generates toolpaths from that voxel data. This lets you run boolean operations between objects, automatically repair broken meshes, and adjust dimensions with predictable results – things that triangle-based slicers handle poorly or not at all.
More Than a Slicer
The software goes beyond standard 3D printing prep. Voxelizer supports nine operating modes covering 3D printing, CNC milling, laser cutting, laser engraving, and thick paste extrusion. Originally built as the companion app for ZMorph multi-tool 3D printers, it also works with RepRap-compatible desktop machines.
Version 2.0 is the current stable release. It runs on Windows 7+ (64-bit), macOS 10.12+, and Linux (via AppImage). The software is completely free – no paid tiers, no feature locks – though you will need to register an account to download and activate it.
Voxelizer uses a three-stage workflow: Scene (import, position, scale, repair), Settings (filament, quality, supports), and G-Code (toolpath preview and export). This guided structure is particularly useful for beginners.
Who Uses Voxelizer?
The primary audience is ZMorph printer owners – VX, VX+, and Fab All-in-One users. The software ships with built-in profiles for all ZMorph hardware and supports their full range of toolheads. Beyond that, it appeals to anyone running multi-fabrication workflows where you might 3D print a part, mill it, then add laser-engraved details, all from one application.
Educators and makerspaces also use Voxelizer for its approachable interface. The three-stage workflow keeps things organized, and the built-in mesh repair means students spend less time troubleshooting broken STL files.
Supported File Formats
Voxelizer reads STL, OBJ, STEP (experimental), JPG, DXF, and DICOM medical files. STEP support, while still marked experimental, allows direct import of engineering CAD files for CNC milling operations with plane and edge selection.
Key Features
What sets Voxelizer apart from other slicers – from its voxel engine to multi-tool fabrication support.
Voxel-Based Slicing Engine
Instead of processing triangle meshes directly, Voxelizer converts your STL and OBJ files into a 3D grid of voxels. Each voxel stores whether it is solid, empty, or partially filled. This makes geometry operations – adding, subtracting, thickening walls – straightforward math rather than complex mesh surgery. You control the voxel grid size to balance detail against memory usage.
Multi-Tool Support (9 Modes)
3D printing, CNC milling, laser cutting, laser engraving, and thick paste extrusion in one application. Supports ZMorph printers and RepRap-compatible machines across nine operating modes.
Multi-Material Printing
Assign separate print settings and different extruders to each voxelized object. Supports color mapping and gradient fills for multi-material jobs on dual-extruder setups.
Tree-Like Support Generation
Five distinct support types: tree supports, lattice fills, power raft, standard supports, and adaptive generation. Each type is tuned for different model geometries and overhang situations.
Adaptive Layer Height
Automatically selects thinner layers for detailed areas and thicker layers for flat surfaces. Reduces print time without sacrificing quality where it matters.
Automatic Mesh Repair
Detects and fixes common issues in imported 3D models – non-manifold edges, holes, inverted normals – without manual intervention. Saves time on problem STL files.
Boolean Operations
Union, subtract, and intersect voxel objects directly. Useful for combining parts, cutting holes, or strengthening weak regions by selectively adding material.
Creative Filters
Apply engraving patterns, Voronoi surface modifications, and other decorative effects to your models. Uses an ambient occlusion technique to identify complex model areas for targeted effects.
System Requirements
Minimum and recommended specs for running Voxelizer 2.0 on your machine.
Operating System
- MinimumWindows 7 (64-bit)
- RecommendedWindows 10/11 (64-bit)
- Also SupportedmacOS 10.12+, Linux
Processor
- MinimumDual-core 2.0 GHz
- RecommendedQuad-core 3.0 GHz+
RAM
- Minimum4 GB
- Recommended8 GB+
- Large Models16 GB for high-res voxels
Storage
- Minimum200 MB free
- Recommended500 MB+ with projects
Display
- Minimum1280 x 720
- Recommended1920 x 1080
GPU
- MinimumOpenGL 2.0 compatible
- RecommendedDedicated GPU, 1 GB+ VRAM
Internet
- RequiredFor registration
- RequiredFor downloading updates
File Formats
- 3D ModelsSTL, OBJ, STEP
- 2D / OtherDXF, JPG, DICOM
Higher voxel resolution settings use significantly more RAM. For models larger than 200mm at 0.1mm voxel size, 16 GB is recommended.
Download Voxelizer
Free direct downloads for Windows, macOS, and Linux. No login required to download the installer.
Windows
- Size 25.5 MB
- Format MSI Installer
- Released July 2018
- Arch 64-bit only
Windows 7, 8, 10, 11 (64-bit)
macOS
- Size 63.7 MB
- Format DMG Disk Image
- Released July 2018
- Arch Intel (x86_64)
macOS 10.12 Sierra or later
Linux
- Source Snap Store
- Format Snap Package
- Channel Beta
- Install
snap install
Ubuntu 16.04+ / Snap-enabled distros
Voxelizer for Fab 3.0 NEWER
Updated version for ZMorph Fab and VX printers. Windows only. 45.2 MB ZIP archive containing the MSI installer.
All downloads link directly to ZMorph’s official servers. No login or registration is required to download the installer. A free ZMorph account is needed to activate the software after installation.
Screenshots
A look at the Voxelizer 2.0 interface – from model import to G-code preview.

How to Install Voxelizer
Step-by-step setup guide from downloading the installer to preparing your first print.
Download the Installer
Head to our download section and click the download button. You will be taken to ZMorph’s official software page where you can grab the installer for your operating system.
- Go to the download section on this page.
- Click “Download Voxelizer 2.0” – this links to the official ZMorph software page.
- If you do not already have a ZMorph account, create one (free registration).
- Select your operating system: Windows (.msi), macOS (.dmg), or Linux (.AppImage).
- Save the installer to a location you can find easily, like your Downloads folder.
The Windows installer is about 30 MB. If the download seems unusually slow, check that your VPN or antivirus is not interfering with the connection to ZMorph’s servers.
Install Voxelizer
The installation process is straightforward. On Windows, you will run a standard MSI installer wizard.
- Locate the downloaded
.msifile and double-click it to start the installer. - If Windows SmartScreen shows a warning, click “More info” then “Run anyway” – this happens because the installer is not from the Microsoft Store.
- Accept the license agreement and choose your install directory (the default is fine for most users).
- Click “Install” and wait for the process to finish. This usually takes under a minute.
- Click “Finish” to close the installer.
On Windows 11, you may need to right-click the installer and select “Run as Administrator” if the standard launch fails. This is a known compatibility quirk with some MSI installers on newer Windows versions.
macOS users: Open the .dmg file and drag Voxelizer to your Applications folder. On first launch, you may need to allow it in System Preferences → Security & Privacy.
Linux users: Make the AppImage executable (chmod +x Voxelizer*.AppImage) and run it directly. No installation required.
Initial Configuration
When you launch Voxelizer for the first time, you need to sign in and select your printer profile.
- Open Voxelizer from the Start Menu (Windows), Applications (macOS), or your file manager (Linux).
- Sign in with the ZMorph account credentials you created during the download step.
- Select your printer model from the list. ZMorph VX, VX+, and Fab All-in-One printers have built-in profiles with pre-configured settings.
- If you are using a non-ZMorph RepRap-compatible printer, select “Custom Printer” and enter your bed size, nozzle diameter, and other hardware specs manually.
- Choose your default filament profile (PLA, ABS, PETG, etc.) or create a custom one with your preferred temperatures and retraction settings.
Voxelizer ships with six manufacturer-supplied filament presets. You can edit any of these or create new profiles from scratch. Temperature and retraction parameters are fully customizable.
Your First Slice
With your printer configured, you are ready to prepare a model for printing. Here is how the three-stage workflow works:
- Scene stage: Click the import button and load an STL, OBJ, or other supported file. Position and scale it on the virtual build plate. Voxelizer will auto-repair mesh issues at this point.
- Settings stage: Choose your print quality (layer height), infill pattern and density, support type (if needed), and any other slicer settings. Voxelizer converts your model to voxels during this step.
- G-Code stage: Click “Generate” to create the toolpath. Use the layer-by-layer preview to inspect the print path, check for issues, and verify support placement.
- When you are satisfied with the preview, export the G-code to an SD card or send it directly to your printer if it is connected via USB.
The layer-by-layer preview is worth spending time on, especially for your first few prints. It shows you exactly what the printer will do at each layer, so you can spot potential problems before wasting filament.
Frequently Asked Questions
Common questions about downloading, installing, and using Voxelizer.
Is Voxelizer free to download and use?
Yes, Voxelizer is 100% free to download and use with no paid tiers, subscriptions, or feature restrictions.
Unlike many slicer applications that offer a “free” version with limited functionality and push you toward a premium upgrade, Voxelizer gives you access to every feature at no cost. That includes the CNC milling engine, multi-material printing support, creative filters, boolean operations, all five support types, and adaptive layer height. Nothing is locked behind a paywall.
The only requirement is that you create a free ZMorph account before downloading the installer. This is used for authentication when you first launch the application and to access software updates. The account registration does not require a credit card or payment information of any kind.
ZMorph S.A. provides the software for free because it is designed as the companion application for their multi-tool 3D printers. Their revenue comes from hardware sales, not software licensing.
Tip: Keep your ZMorph account credentials saved somewhere accessible. You will need them each time you install Voxelizer on a new machine or after a fresh Windows installation.
Is Voxelizer safe to install on Windows 10 and 11?
Yes, Voxelizer is safe to install on both Windows 10 and Windows 11. The software is developed and distributed by ZMorph S.A., a legitimate hardware manufacturer based in Wroclaw, Poland, that has been in the 3D printing industry since 2013.
There are a few things to keep in mind during installation:
- Windows SmartScreen warning: You may see a blue popup saying “Windows protected your PC” when you first run the installer. This happens because the MSI file is not distributed through the Microsoft Store. Click “More info” and then “Run anyway” to proceed. This is standard behavior for third-party desktop software.
- No bundled software: The Voxelizer installer is clean. It does not bundle browser toolbars, adware, search engine hijackers, or any other unwanted programs. The installation only places Voxelizer files on your system.
- Antivirus compatibility: In rare cases, overly aggressive antivirus software may flag the installer as suspicious. This is a false positive. If it happens, add an exception for the Voxelizer installer in your antivirus settings.
Tip: Always download Voxelizer from the download section on this page or directly from ZMorph’s official website to avoid tampered copies from third-party download mirrors.
Does Voxelizer work with non-ZMorph printers?
Yes, Voxelizer can work with non-ZMorph printers, but with limitations. The software includes a “Custom Printer” configuration option that lets you set up any RepRap-compatible 3D printer manually.
Here is what you will need to configure for a custom printer:
- Build volume: Enter your printer’s X, Y, and Z dimensions in millimeters
- Nozzle diameter: Specify your hotend nozzle size (typically 0.4mm)
- Heated bed: Toggle on/off and set bed temperature limits
- Extruder count: Single or dual extruder configuration
- Firmware type: Select the firmware your printer runs (Marlin, RepRap, etc.)
That said, Voxelizer is designed and optimized for ZMorph hardware. The built-in printer profiles, toolhead configurations, and firmware communication protocols are all tuned for ZMorph VX, VX+, and Fab All-in-One printers. If you own a different printer brand (Creality, Prusa, Ender, etc.), slicers like Cura or PrusaSlicer will likely give you a smoother experience since they ship with thousands of pre-configured profiles for popular machines.
Tip: If you decide to use Voxelizer with a custom printer, start with a simple calibration cube before slicing complex models. This helps you verify that your manually entered settings produce accurate dimensions.
What file formats does Voxelizer support?
Voxelizer supports six file formats: STL, OBJ, STEP (experimental), JPG, DXF, and DICOM. Each format serves a different purpose within the software’s multi-fabrication workflow.
Here is a breakdown of each supported format and when to use it:
- STL (Stereolithography): The most common 3D printing format. Use this for standard 3D printing jobs. Voxelizer auto-repairs common STL issues like non-manifold edges and inverted normals on import.
- OBJ (Wavefront): Another widely used 3D model format. Supports color and material information, which is useful for multi-material prints.
- STEP (Experimental): A CAD engineering format. Primarily used for CNC milling operations where you need to select specific planes and edges for toolpath generation. Still in experimental status, so expect occasional import issues with complex assemblies.
- JPG: Used for laser engraving operations. The image is converted into a raster pattern that the laser head follows.
- DXF: A 2D vector format used for laser cutting paths. Import your vector artwork and Voxelizer generates the cutting toolpath.
- DICOM: Medical imaging format (CT scans, MRI data). Allows you to 3D print anatomical models from medical scan data.
Tip: If your 3D modeling software exports in a format not listed above (like 3MF or AMF), convert it to STL first using a free tool like MeshLab or the built-in export option in most CAD programs.
What are the system requirements for Voxelizer?
Voxelizer requires a 64-bit system with at least a dual-core 2.0 GHz CPU, 4 GB of RAM, 200 MB of free disk space, and an OpenGL 2.0 compatible GPU.
Here is the full breakdown of minimum versus recommended specifications:
- Operating System: Windows 7 or later (64-bit required), macOS 10.12 Sierra or later, or Linux via AppImage
- CPU: Minimum dual-core 2.0 GHz; recommended quad-core 3.0 GHz or faster. Voxel processing is CPU-intensive, so more cores and higher clock speeds directly reduce slicing time.
- RAM: Minimum 4 GB; recommended 8 GB. If you work with large models at high voxel resolution (0.1mm or finer), 16 GB is strongly recommended. Voxelizer loads the entire voxel grid into memory during processing.
- GPU: Minimum OpenGL 2.0 compatible; recommended dedicated GPU with 1 GB+ VRAM. The 3D viewport and layer preview rely on GPU rendering.
- Storage: 200 MB minimum for installation. Budget 500 MB or more if you store G-code files and project data locally.
- Display: 1280×720 minimum; 1920×1080 recommended. The three-panel interface works best on larger screens.
Check the system requirements section above for the complete specification table.
Tip: If you notice slow performance during voxelization, try reducing the voxel grid resolution in the Settings stage. A coarser grid uses significantly less RAM and processes faster, which is often acceptable for draft prints.
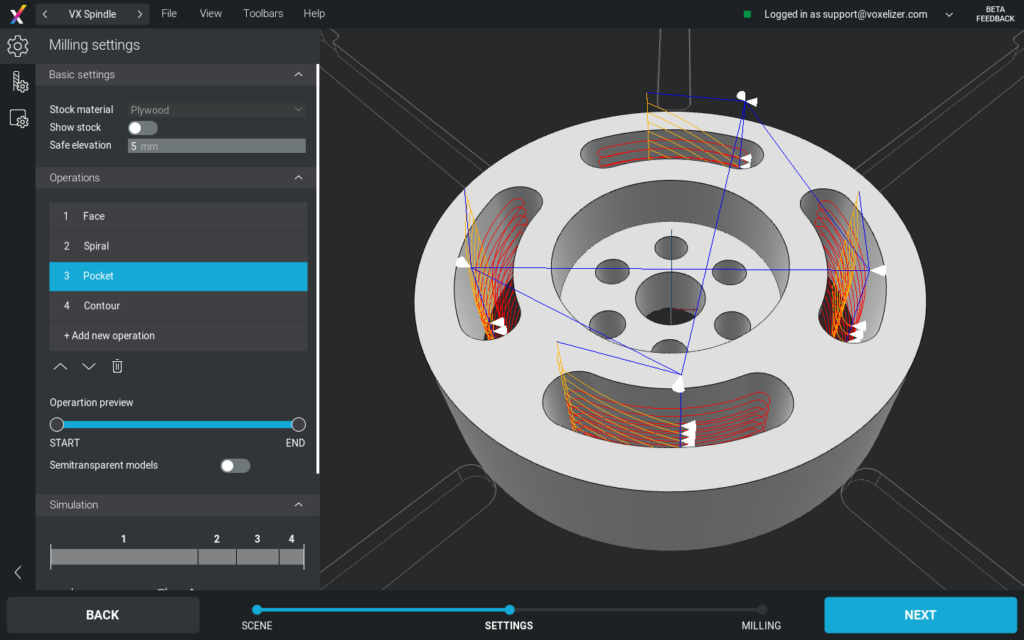
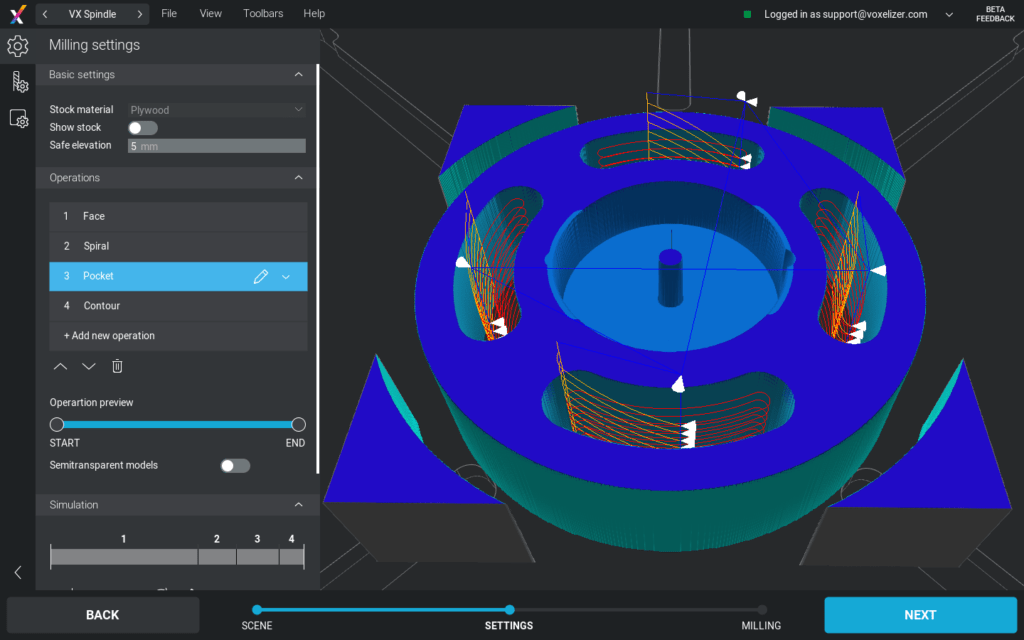
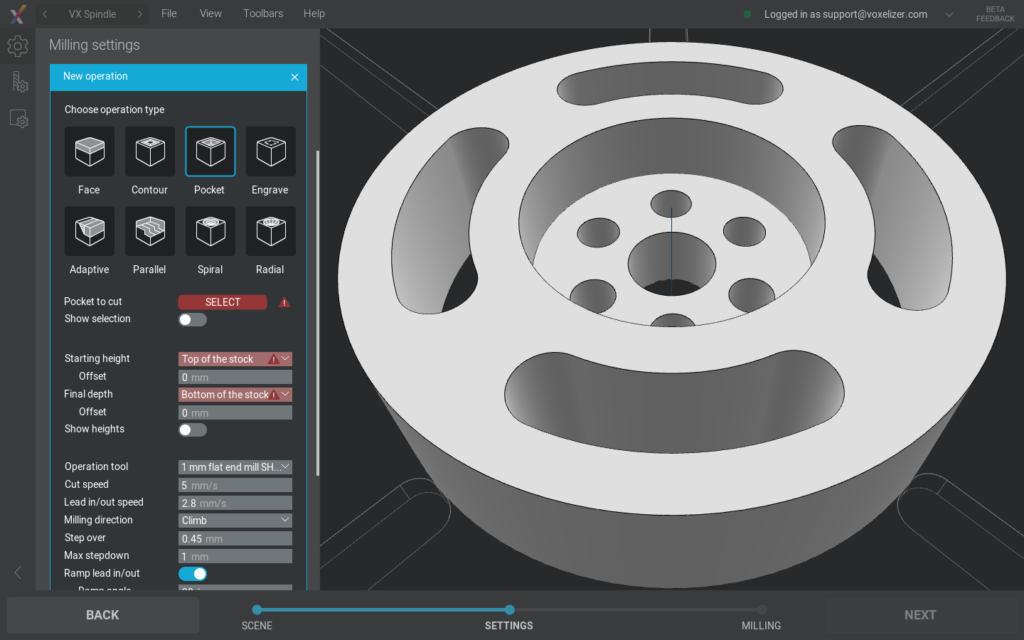
Does Voxelizer support CNC milling?
Yes, Voxelizer includes a CNC milling engine, though it is currently marked as experimental. This feature is one of the things that separates Voxelizer from standard 3D printing slicers like Cura or PrusaSlicer.
The CNC milling mode supports several advanced capabilities:
- Multiple input formats: Generate milling toolpaths from STEP files, 3D meshes (STL/OBJ), or 2D vector files (DXF)
- STEP plane and edge selection: When working with engineering CAD files, you can select specific faces and edges to define your milling operations
- Local coordinate systems: Set up custom work offsets and origins for precise positioning on your material stock
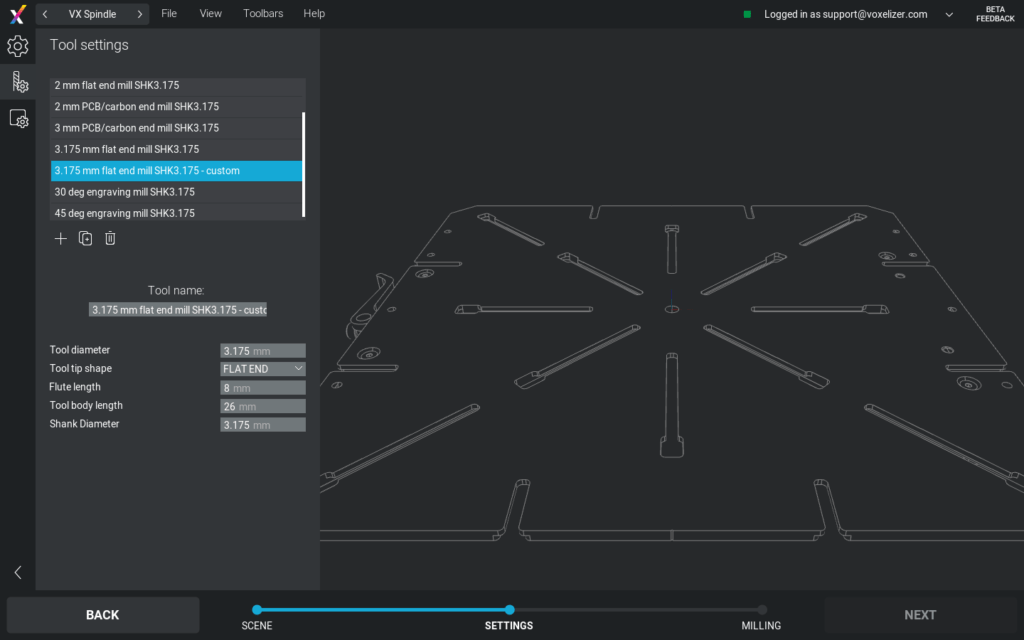
- Tool changes: Configure multiple tools within a single milling job, allowing roughing and finishing passes with different end mills
- Collision detection: The simulation view checks for potential collisions between the tool, workpiece, and machine frame before you run the actual job
This feature is designed primarily for ZMorph printers equipped with a CNC milling toolhead. If you are using dedicated CNC hardware (like a Shapeoko, X-Carve, or industrial mill), specialized CAM software such as Fusion 360 CAM or Estlcam will give you more control and better toolpath optimization.
Tip: Since the CNC milling engine is experimental, always run the simulation preview thoroughly before sending G-code to your machine. Pay close attention to plunge rates and feed speeds in the generated code.
How do I generate tree supports in Voxelizer?
To generate tree supports in Voxelizer, navigate to the Settings stage and select “Tree” from the support type dropdown in the Supports section.
Here is a step-by-step walkthrough of the process:
- Import your model in the Scene stage and position it on the build plate
- Move to the Settings stage by clicking the “Settings” tab or the forward arrow
- Scroll down to the Supports section in the settings panel
- Enable supports by toggling the support option on
- From the support type dropdown, select “Tree”
- Adjust the tree support parameters: trunk diameter, branch angle, contact distance, and support density
- Click “Generate” to create the voxelized model with tree supports applied
- In the G-Code stage, inspect the layer-by-layer preview to verify support placement
Voxelizer offers five distinct support types in total: Tree, Lattice, Power Raft, Standard, and Adaptive. Tree supports branch upward like a tree trunk, touching the model only at overhang contact points. They use less material than solid supports and leave smaller marks on the printed surface when removed.
Tip: Tree supports work best for models with scattered overhangs. For models with large flat overhangs (like bridge sections), lattice or standard supports may provide better bed adhesion and print stability.
Can I use Voxelizer for multi-material printing?
Yes, Voxelizer supports multi-material printing for printers with dual-extruder setups. This is one of the application’s standout features, particularly for ZMorph users who have dual toolhead configurations.
Here is how multi-material printing works in Voxelizer:
- Per-object settings: Each voxelized object in your scene can be assigned its own extruder, material, temperature, speed, and retraction parameters. This means you can print one part of your model in PLA and another in PETG, each with their own optimized settings.
- Color mapping: Assign different colors to different objects or regions of your model. The slicer handles the toolpath sequencing to switch between extruders at the right moments.
- Gradient fills: Apply gradual color transitions across a model surface, creating visual effects that would be difficult to achieve with other slicers.
- Separate support material: You can assign one extruder for your main model material and the other for dissolvable support material (like PVA), making support removal effortless after printing.
For the best results, your dual toolheads need to be properly calibrated. Misaligned extruders will cause visible offsets between materials. ZMorph’s built-in calibration routines handle this for their hardware. On custom printers, you will need to measure and enter the extruder offset values manually.
Tip: Start with a simple two-color calibration test print before attempting complex multi-material jobs. This confirms your extruder offsets are accurate and your ooze shields or wipe towers are working correctly.
Voxelizer vs Cura – which slicer is better?
Voxelizer and Cura serve different purposes, and the better choice depends on your printer hardware and workflow needs.
Here is a direct comparison across key areas:
- Printer compatibility: Cura wins by a large margin. It ships with profiles for thousands of printers from dozens of manufacturers. Voxelizer is optimized for ZMorph hardware only, with limited support for custom RepRap machines.
- Slicing engine: Voxelizer uses a unique voxel-based approach (converting models to a 3D grid of cubes), while Cura uses traditional triangle mesh processing. The voxel method enables boolean operations and automatic mesh repair that Cura handles differently.
- Multi-fabrication: Voxelizer supports 9 fabrication modes (3D printing, CNC milling, laser cutting, laser engraving, thick paste extrusion). Cura is purely a 3D printing slicer.
- Community and plugins: Cura has a massive user community, active forums, hundreds of community plugins, and regular updates from Ultimaker/UltiMaker. Voxelizer has a much smaller user base and no plugin ecosystem.
- Development activity: Cura receives regular updates with new features and printer profiles. Voxelizer has not had a major update since 2019.
- Learning curve: Voxelizer’s three-stage workflow is more structured and arguably easier for beginners. Cura’s single-screen interface offers more flexibility but can feel overwhelming with its 400+ settings.
Bottom line: If you own a ZMorph printer and use its multi-tool capabilities, Voxelizer is the right choice. For everyone else, Cura (or PrusaSlicer) is the more practical option with far better printer support and community resources.
How do I update Voxelizer to the latest version?
Voxelizer does not have a built-in auto-update feature, so you need to manually download and install the latest version.
Follow these steps to update:
- Visit the download section on this page or go directly to the official ZMorph software page
- Log in to your ZMorph account (the same account you used for the original download)
- Download the latest installer for your operating system (Windows MSI, macOS DMG, or Linux AppImage)
- Close Voxelizer if it is currently running
- Run the new installer. It will upgrade your existing installation in place without removing your settings
- Launch Voxelizer and verify the version number in the application title bar or Help menu
Your printer profiles, filament presets, and custom settings are preserved during the update process. The installer replaces only the application files, not your configuration data stored in the AppData directory.
It is worth noting that Voxelizer 2.0 has been the stable release since July 2018. The experimental branch received its last update in July 2019. While the software remains functional on modern operating systems, major new features are unlikely at this point.
Tip: Before updating, note your current version number (visible in the title bar). If the new version causes issues, you can try to find the previous installer on ZMorph’s site or contact their support for a rollback option.
Is Voxelizer still being updated?
Active development of Voxelizer has slowed significantly since 2019, but the software remains available for download and works on current operating systems.
Here is the timeline of Voxelizer’s development:
- July 2018: Voxelizer 2.0 released as the stable version, representing a major rewrite from version 1.x
- July 2019: Last known update to the experimental branch with minor fixes and improvements
- 2020-present: No major version updates or feature additions have been publicly released
Despite the lack of active development, Voxelizer 2.0 continues to work reliably on Windows 10, Windows 11, and current macOS versions. The core slicing engine, multi-tool support, and G-code generation all function as intended. ZMorph still hosts the download on their official website and provides it as the recommended software for their printer lineup.
For ZMorph printer owners, Voxelizer remains the only slicer with full support for their multi-tool hardware (3D printing, CNC, laser). No third-party slicer replicates this multi-fabrication workflow. If you need a slicer that receives regular updates and has an active development community, alternatives like Cura, PrusaSlicer, or OrcaSlicer are worth considering for standard 3D printing tasks.
Tip: Join the ZMorph community forums or subreddit to stay informed about any future software announcements. Some users also share custom printer profiles and workarounds for common issues.
How to fix Voxelizer not starting on Windows 11?
If Voxelizer is not starting on Windows 11, the issue is usually related to administrator permissions, GPU drivers, or antivirus interference. Here are the troubleshooting steps in order of likelihood:
- Run as Administrator: Right-click the Voxelizer shortcut or .exe file and select “Run as Administrator.” Windows 11 has stricter permission controls than previous versions, and some older applications need elevated privileges to write to their data directories.
- Update GPU drivers: Voxelizer requires OpenGL 2.0 support. Open Device Manager, expand “Display adapters,” right-click your GPU, and select “Update driver.” Alternatively, download the latest drivers directly from NVIDIA, AMD, or Intel’s website. Outdated or generic Microsoft drivers often lack full OpenGL support.
- Try compatibility mode: Right-click the Voxelizer .exe file, select “Properties,” go to the “Compatibility” tab, check “Run this program in compatibility mode for,” and select “Windows 10.” Click Apply and try launching again.
- Check antivirus: Some security software (particularly Avast, Norton, and Kaspersky) may block Voxelizer from starting because it is not a widely recognized application. Temporarily disable your antivirus real-time protection and try launching Voxelizer. If it works, add an exception for the Voxelizer installation directory.
- Reinstall: If none of the above work, uninstall Voxelizer completely (including removing the folder in AppData), download a fresh copy from the download section, and install it again.
Tip: If the application opens briefly and then crashes, check the Windows Event Viewer (search “Event Viewer” in the Start menu, go to Windows Logs → Application) for error details. A crash log mentioning “OpenGL” or “display” confirms a GPU driver issue.